I think that if I hadn't chosen late 15th/early 16th century Italy as the time and place for my SCA persona, I would have probably decided to be 14th century. There's something about 14th century cotehardies. They're quintessentially medieval.
I've made what I call faux-hardies in the past - garments that look like cotehardies, but are basically built like a t-tunic, with no built in support. And I've made fitted cotehardies for other people. But I've never made a true, 14th century fitted cotehardie for myself, until now. And I see what all the fuss was about. They're kind of awesome.
I'm going to include a few construction notes and pictures here. The under-cotehardie is a dark green, heavier weight linen. All the support for the dress is built into this layer. Because linen stretches slightly, and because all the support for this gown is built into a single layer cote, you must account for the stretch while fitting. Otherwise, you'll get partway through a day and find that the fabric has relaxed, and things are no longer as supportive as they were that morning... Not a good feeling.
I started with my usual Gothic fitted dress pattern and cut out the four panels of the dress, two for the front, and two for the back.
Pin together the bodice of the dress on the back and side seams, to the point where the gores start. Also at this point, sew a strip of fabric as facing to either side of the front opening, make your eyelets. Then put on the dress and lace it up. Wear it around the house for 15-20 minutes to allow the linen fibers to warm up from your body heat and stretch. Then remove any slack from the side seams and pin them further in. Unlace the dress, straighten up the pins and make sure the lines are straight and symmetrical, and repeat the process. Here is the dress in the middle of that process, with pins in the side seams.
And here's what I ended up with. Along the edge of the fabric is where I originally though the seam line should be, and the pin line shows where the seam ended up.
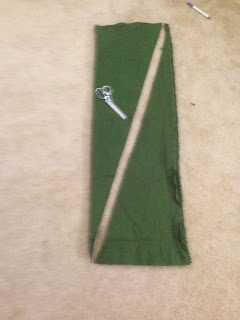
Then, continue with the rest of the dress. You need four gores. Here's a trick my friend Daisy showed me on the most efficient way to cut gores. Cut a strip of fabric the length your gores need to be and the width of your fabric. .
Fold it in fourths like an accordion.
Then cut this diagonally.
You end up with three whole triangular gores, and two end pieces, which you can sew down the middle to make a gore.
And here's the sleeve pattern I came up with. I think sleeves are my least favorite part of sewing these types of gowns. I'm so accustomed to detachable sleeves that I find it especially trying to have to match up the sleeve cap with the armsye.
I put self-fabric buttons along the arm from the elbow to the wrist. They're fitted enough that I have to unbutton the last couple of buttons to get the sleeve over my hand. Also, because of the fit of the dress, when I put it on, I have to mostly lace it, then let the fibers warm up and stretch for a few minutes before I can lace it all the way closed.
The blue overgown used the same pattern, but with a tiny bit more ease in the side seam, as this layer didn't have to be supportive. It buttons up the front, and the sleeves end just above the elbow.
I also made detachable tippets - they fasten around my upper arm with a hook and eye. I usually hide the strap under the sleeve of the blue overgown. And I'm wearing the gown with a simple white linen barbette and veil.
Pictures!
And I just had to share of picture of this lady from the Romance of Alexander. She and I share a similar color scheme.


Do you have to use linen or can cotton poplin be used instead? I ask because I am making a gown for day to day wear, will wear bra underneath, because I like the style and find it practical and comfortable (though I will lose the gores for a narrower hem width).
ReplyDelete